Posted in Food Favorites, Freedom Friday

Cucumber Salad

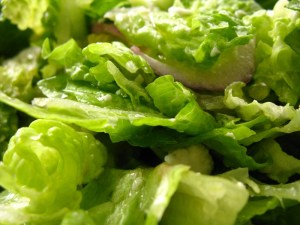
Cucumbers are one of my favorite vegetables. I add them to salads. I have them plain. I even toss them into a bowl, dipping them into olive oil as a snack. Cucumbers are great. That’s why for this Freedom Friday post I’m going to share with you one of my absolute favorite cucumber salad recipes ever. If you’re looking for something to eat on a Sunday afternoon, this is the recipe for you.

My cucumber salad recipe

Although tailored for summer fun, this recipe came from my ongoing experimentation with different food combinations. If anything, this dish has more of a Greek/Mediterranean flavor combination suitable for an evening get-together with friends and family alike. But it doesn’t mean you can’t enjoy it any other time.

Let’s get to it.

Here are the ingredients you’ll need:

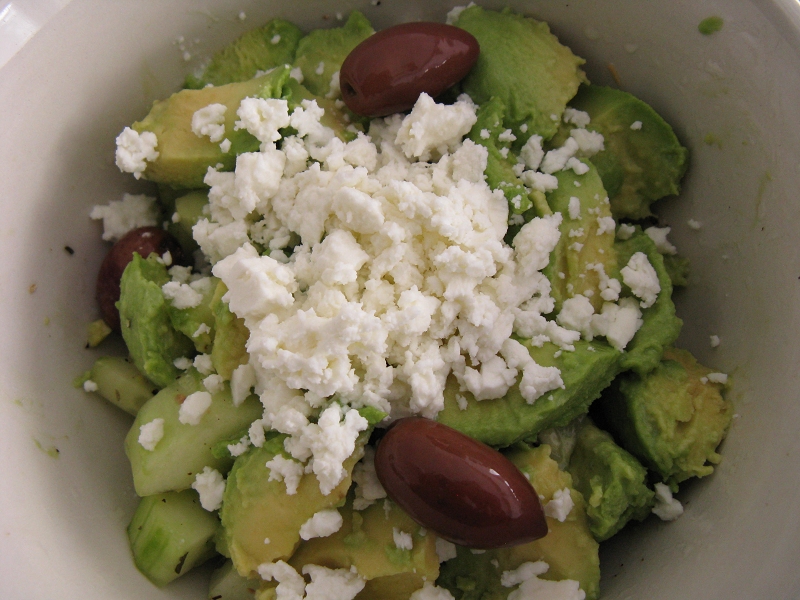
  • Half an English cucumber
  • 1 avocado
  • Half a lemon
  • Oregano
  • Half a garlic clove
  • Salt
  • Fresh ground pepper
  • Greek olives
  • Feta cheese
  • Olive oil

Directions:

  • Cut an English cucumber in half, peel it and slice it into small pieces, and add it to a deep bowl. Some folks like keeping the skin on the cucumber, which is great because the skin has lot of vitamins. In this case, however, I peel it to give the dish a particular flavor I’ve grown to like. Nonetheless, you can keep the peel if you want.
  • Chop half a garlic clove and add it to the bowl. Trust me, adding half a garlic is being stingy. I’m Italian, garlic runs in our veins. Too much garlic is never enough.
  • Now, add oregano, fresh ground pepper, salt, Greek olives, a generous dousing of olive oil and a splash of lemon juice. Regarding the amounts to add, I can answer that simply by saying “to taste”. I love oregano, so I add quite a bit of it. The same goes for the fresh ground pepper, nothing quite like the flavor to surprise someone trying it for the first time. 
  • Toss the ingredients with salad spoons or ordinary spoons for that matter.
  • The last step is to scoop the meat from an avocado into the bowl. Add a good amount of feta cheese on top and you’re good to go. The reason we don’t toss the final ingredients in the salad is to avoid them from getting soggy. No one wants a mushy salad.
Ingredients
Ingredients
Cucumber diced in bowl
Spices added
Spices added
Before tossing the ingredients
The complete dish
The complete dish

I hope you enjoy this recipe as much as I do. If you ever do try it out, make it part of a BBQ on a hot summer evening and let me know what you think.

RANGER MARTIN AND THE ZOMBIE APOCALYPSE, now on sale.

Do you have any cucumber recipes you’d like to share?

Posted in Food Favorites, Freedom Friday

Food Tips

I enjoy food as much as the next guy. In fact, I would venture to say, I eat for the shear pleasure. I never used to be this way. Most of my meals years ago had trouble staying in my mouth more than a few seconds before they hit the bottom of my stomach. I ate fast. I played hard. And lived for no tomorrow. Of course, I don’t do that anymore, and I’m happier and healthier for it.

A full pantry (Photo Credit: theperfectpantry.com)

I thought for Freedom Friday you’d appreciate a few tricks I have up my sleeve whenever I’m in the kitchen cooking a meal. I’ve always wanted to write these tips in a notebook, but how can that happen if I’m either in the kitchen cooking for the family or at my laptop writing other stuff? And don’t worry, although I write about zombies it doesn’t mean I am one. I’ll leave the undead to worry about eating brains.

Let me start by saying every kitchen needs a few basic ingredients. Salt, pepper, and olive oil make it almost into every meal. That’s why our family buys those ingredients in bulk. If you have a cold room or pantry, you can store the basics in there for a long time before you need to stock the shelves again. I suppose you can do the same thing with toilet paper, but I’d recommend not eating toilet paper.

Here’s something I’ve learned when I went on a one-year viewing binge of Food Network Canada. Chances are I picked up a thing or two here and there as I watched, however, one of the coolest tips I got from them has to do with knowing when the oil in the pan is hot enough for frying. All you do is wet your finger with water and allow a drop to fall to the pan. If the water snaps in the pan, then you know it’s perfect for frying.

Which reminds me, if you’re going to try this trick, make sure you stand well back from the pan. You don’t want to make your meal to-go, as in going to the hospital ‘cause your eye was an inch away from the pan.

How to hold a chef's knife (Photo Credit: stellaculinary.com)
How to hold a chef’s knife (Photo Credit: stellaculinary.com)

You’d think holding a knife is easy. Not at Casa Flacco. When I’m cutting vegetables, I grasp the knife by the handle, curling my index finger to the side of the blade while my thumb leans on the other side, half on the blade and half of the handle. Not only is it safe, but you have better control of the cutting. With the other hand, I curl my fingers so as my fingernails fall at a ninety-degree angle on the vegetable. Then, I cut with a rhythm, rocking the knife on its tip as I bring the blade down on the vegetable. I learned this technique from one of these fancy-shmancy chefs in order to prevent a premature amputation of a digit.

The proper cut (Photo Credit: besthomechef.com.au)

Not so much a tip as it is a recommendation, but enjoying your food ranks up there with turning off the stove when you’re done with it. It involves not rushing through your meal so you can spend countless of senseless hours in front of a screen. I’ve done it many times and it doesn’t do justice to the digestive tract. Eating your food at a leisurely pace invokes a relaxed atmosphere conducive to pleasure. The food settles better, too. I know, it’s hard to do in this day and age where we’re rushing everywhere. But it beats ravaging a side of steer and washing it down with a gallon of gin.

RANGER MARTIN AND THE ZOMBIE APOCALYPSE, now on sale.

Do you have any food tips you’d like to share? Are you a fast eater?

Posted in Food Favorites, Freedom Friday

Curry Chicken

Having watched the Food Network for a full year made me appreciate the culinary delights of cooking with a few simple ingredients. No, this is not a zombie post. Nor is it a piece dedicated to strong chicks that kick butt. But this Freedom Friday entry is about a quick and easy recipe you can try at home with minimal to no chef experience. Yeah, that describes me, all right.

Curry Chicken
Curry Chicken

Real Jamaican curry chicken is hard to make. I know because some of my best friends are Jamaican and theirs is beyond description. Does the term “mouthwatering, savory dish” mean anything to you? It will be once you taste the real thing. Mine is a cheap imitation knock-off. But, as my kids have indicated several times, “Is this ever good.” It’s an ever-good, cheap imitation knock-off.

Okay, enough with the chitchat, let’s get to my recipe, as I know you’re dying to get started on it!

You will need chicken. I always get my chicken from Costco since they package their meats in affordable units. For instance, in my neighborhood, 24 skinless chicken thighs is about $24. I’m paying a buck a thigh. I think that’s a good deal. If you don’t have a Costco, you can try the regular supermarket, although I’m sure you’ll pay much more for the same package.

Once I get my chicken, I tend to soak 12 pieces in brine overnight. Not to make it complicated or anything, my brine is salt water. You can use a pot, which works well. Load the pot with the chicken thighs, add water, and add lots of salt. I can’t say how much salt. I go with what I’m used to—about ten dashes. How’s that for a scientific measuring system? Make sure the fridge is cold enough so as the chicken doesn’t spoil. I can’t stress enough how important it is to ensure food meets health and safety specifications.

Before going on, the reason for soaking the chicken in brine is to plump up the pieces. Ever wonder how restaurants get their chicken to look so huge? They soak them in brine to get the meat to swell at massive proportions. Nice trick, eh?

Next, set the chicken in a skillet/baking pan—your choice. We use a glass skillet in our house and it works fine for our family. If you have something else, that’s fine too. It’s nothing to get hung up about.

Raw skinless chicken thighs

Add your ingredients:

  • Cayenne
  • Curry powder
  • Garlic powder
  • Ginger powder
  • Onion powder
  • Pepper
  • Salt
Ingredients
Ingredients

And when I mean add your ingredients, I mean sprinkle to taste. You may only want to give a couple of dashes of cayenne, but pour on the curry. After all, it is curry chicken. Have a gander at the photo to get an idea of what it looks like before baking.

With ingredients
With ingredients

What you’ll want to do is set your oven to 375°F and cover the dish with aluminum foil. This will trap all the flavors inside the skillet to make the meat nice and tender when serving. Leave it in there for an hour and prepare the side dishes. I typically make peas or have some fries on the side. On this particular Saturday, my wife jumped in with some corn on the cob. It was goo-ood!

Covered
Covered

Once done, take the chicken from oven, let stand for about five minutes in order to allow it to absorb the juices from the skillet, then serve with side dishes.

Out of the oven
Out of the oven

In the photo at the beginning of the post you see the curry chicken served with corn on the cob, marinated egg plant, and green beans. What a wonderful, delectable dish!

Enjoy!

RANGER MARTIN AND THE ZOMBIE APOCALYPSE, on sale October 22.

Have you ever cooked Jamaican-style curry chicken? If so, how do you do it? Do you have any chicken recipes that have become a staple with your family?

Posted in Food Favorites, Freedom Friday

Salads

Summer’s almost over. I know, I know. Where are the fanfares to send the kids back to school? All joking aside though, what I’ll miss the most from the hottest season of the year are the salads. Some may say BBQ, which is cool and all, but for me, a fresh salad with assorted ingredients makes my summer. I’m going to give you a few quick tips about salad preparation for Freedom Friday, and I hope your next experience with the delectable greenery is a delicious one!

Our feta, onions, cucumber salad, Apr. 2013.

Living in one of the most agriculturally diverse provinces in Canada, Ontario, our backyard has gone through various transformations throughout the years. When I say our backyard, I mean Casa Flacco’s backyard, as in, behind-our-house backyard. This year, we have made the most ambitious attempt at farming yet. In past years, we’ve had a small strip of land by the side of a fence dedicated to vegetables and salads. This year we’ve increased the size of the original and added two more sections, each section separated by green space.

I don’t know what it is with our backyard. Somehow, whatever we plant turns into these gianormous jungles we attempt to tame but bless us with a bounty of crops we never had intentions of growing.

At the beginning of the season, my wife asks, “What do you think we should grow this year?”

I typically answer, while flipping the channels, “I don’t know. Tomatoes would be good. Cucumbers. Salads. We have to have salads. Definitely have to have salads.”

That’s how it starts. Next thing you know, near the middle of the season, our salads look like leaves from the Cretaceous Period. Our tomatoes look like pumpkins that need trucks to transport. And our zucchinis like, well, I’m not sure. Take a look at the photo.

Zucchini plant in our garden, Aug. 2009.
Zucchini from our garden, Aug. 2009.
Tomato from our garden, Sep. 2008.

Seriously, sometimes I feel as if our yard has radioactive soil. If you ever hear reports of a man climbing buildings in Toronto and spinning webs, you’ll know what happened to me. Anyway, talk about getting caught up in the moment, let’s get back to the point of this post—salads.

We grow radicchio and the regular garden-variety salad. The radicchio is my favorite because it’s easy to prepare and mouth-watering on its own.

Here’s what we do:

  • Cut the leaves from the garden, plopping them in a pot or bowl, dirt, grime, slugs and all—yes, slugs
  • Take it into the house, wash the leaves thoroughly, getting rid of the slugs—you didn’t think we’d eat those things, did you?
  • Add some olive oil and salt
  • Munchtime!

Radicchio is a naturally bitter salad. The salt accentuates the flavor along with the olive oil. Fresh from the garden is something special to savor in the summer. Can’t be beat.

Now, as for the long-leaf salad, which is oh, so sweet and crunchy to the taste buds, the washing prep is pretty much the same as the radicchio. So, I’ll just give you the recipe we have year-round.

Ingredients:

  • A generous amount of crumpled feta cheese
  • Half a sweet white onion chopped
  • 1 peeled and sliced cucumber
  • Olive oil
  • Salt

Directions:

  • Make sure you wash and dry the leaves properly. Invest in a good salad strainer; it makes life so much easier. Besides, leaves will not come out all soggy. You want them to crunch.
  • Add in your ingredients except the feta and olive oil.
  • Before serving, add your olive oil, toss the salad, then add your feta on top otherwise the feta becomes mushy and disappears in the salad as a nice white coat over the leaves.

And there you have it. Casa Flacco’s two salad recipes I’m sure you’ll enjoy trying before the summer’s over.

Buon appetito!

RANGER MARTIN AND THE ZOMBIE APOCALYPSE, on sale October 22.

Do you have any salad recipes you’d like sharing? How about ingredients? What do you like putting in your salads?

Posted in Food Favorites, Freedom Friday

Avocados

Did you know avocados are a fruit? I didn’t know that for a long time. Much like tomatoes, they have a seed inside. According to science, that’s what makes it a fruit. In cooking, however, it’s a different matter. Served in delicious savory meals, chefs define it more as a vegetable. Avocados also provide an enjoyable snack for the health conscious.

Avocado & Lemon
Avocado & Lemon

For my Freedom Friday series, I would like to show you how easy it is to make avocados a part of a nutritious, balanced diet.

When my wife first introduced avocados in our diet a few years ago, I wasn’t sure what to make of it. I trusted her sense of flavor, but as in all things borne from the unknown, I still had my reservations. She got the idea from watching someone. And one day she brought a bag full of the Persea americana from the grocery store. From there, as my sense of curiosity got the best of me, she went on to show me how to eat it.

This is the easiest avocado recipe in the world. Anyone can make it. With a handful of ingredients, guaranteed you’ll like it too!

Ingredients:

  • 1 avocado
  • 1 lemon (you really don’t need a whole lemon, or half a lemon for that matter)
  • salt

Directions:

  • Cut the avocado lengthwise exposing the seed as an oval. I usually use a steak knife, but you can use any ol’ knife. Just make sure it’s sharp and can penetrate the avocado’s hard skin. To remove the seed, I always stab it in the center with the knife, jostle it a bit, and it should pop right out of there.
  • Once you’ve removed the seed, with the same knife gently poke holes into the avocado’s meat. They don’t have to go all the way to the bottom. And you don’t have to poke a million holes. Just enough for the next step.
  • Squeeze some lemon on the meat. All that lemon juice will then seep into the holes from the previous step. This way a balanced coat of flavor covers the meat.
  • Sprinkle salt to taste
Avocado Ingredients & Utensils

To eat it, all you need is a spoon. Believe me when I say it’s a refreshingly delicious snack!

For those wondering the health benefits of avocados:

Do you like avocados? Do you have a recipe you’d like to share?

Posted in Food Favorites, Freedom Friday

Eggs and Hash Browns

As part of Freedom Friday, let me introduce to you my favorite dish I make on a hurried Wednesday night. I’ve been making this for years. Sometimes I add to it, sometimes I take away from it. But most of the time, it remains the same: eggs and hash browns.

Cheese Omelet and Hash Browns

Wednesday is Costco night for us. This means a night where I head over to the consumer warehouse and buy everything in bulk. It’s amazing how far my dollar stretches when the product comes bundled in boxes. By the time I get home, I’m too tired for anything else. That’s when the routine developed of cooking eggs on Wednesday night. They’re quick, easy, and it takes me twenty minutes tops from idea to plate.

Fried Eggs—This is the easiest recipe. Crack a couple of eggs in a frying pan and away you go. It may seem easy, however if the pan isn’t greased properly, sunny side up eggs will become scrambled in no time. I use an extra large chrome skillet and prep it with olive oil, allowing the oil to cover the entire bottom of the pan. Not a lot—just enough to coat. Then I turn on the burner to medium heat. How do you know if the oil’s hot enough? Dip your finger in water and allow a drop to fall into the pan. If it pops, it’s ready.

Fried Eggs and Hash Browns

Start cooking the eggs (you don’t need me to tell you to crack them and place them into the pan, do you?) When the egg white turns white, drop the heat to a minimum temperature, this will prevent the bottom of the eggs from burning. To know if the eggs are ready, I touch the top of the yolk with the pad of my finger. Do this until the eggs feel room temperature (I don’t know what to tell you if your eggs didn’t come out of a fridge). Also, as it cooks, use the spatula to lift carefully the edges. Once it’s done, the eggs should naturally slide off the pan into the plate.

Scrambled Eggs—There’s a trick to making good scrambled eggs: never allow them to cook long. They have to remain fluffy and moist. Not like rubber, where you chew it and it tastes like the inside of a boot (not that I know what that tastes like, nor do I want to know). Attaining fluffiness is easy. Crack a couple of eggs in a bowl and beat senseless. Well, at least until they have a creamy texture to them. If you like, you can add a touch of cream or milk to them, but I usually don’t bother.

Now, prepare the pan just as I’d described in the fried egg paragraph. There’s a difference though. Once the eggs hit the pan, turn off the burner and continually fluff them with a spatula. Keep doing this until the eggs look loose but not soggy. When you get them to that consistency, you’ve got yourself a fluffy scrambled egg.

By the way, a few things you can do with scrambled eggs to make them interesting is while they’re cooking, add some spices to the mixture. I do this in the bowl where I beat them. I like paprika, cumin, and garlic and onion powder. I’ll then season it with little salt and pepper.

I have an omelet recipe, but I think I’ll save it for another time.

As for the sides, I’ll make hash browns, which take about twenty minutes to cook. I tend to time my eggs so everything pops from the stove all at the same time. Depending on my mood, I’ll add baby carrots or celery as another side dish. Cucumbers are cool, but I find the taste less desirable—I don’t think it makes a good combination. Maybe I’m wrong. Oh, and during the summer, I eat salads, so that’s something to consider when making any of the egg dishes I described.

Do you have any egg recipes you’d like to share? What would be your choice of sides?

Posted in Food Favorites, Freedom Friday

Eleven-Spice Chicken

Saturdays is a big thing here at our house. While everyone in our neighborhood shovels the snow from their driveway, goes shopping or runs errands, my family unplugs and relaxes with good food, great conversation and awesome friends. This is my Freedom Friday post, and this is my Eleven-Spice Chicken recipe.

Eleven-Spice Chicken Dish

My family lives a hectic lifestyle. I can’t tell you how busy my wife gets hauling the kids back and forth to their activities or how I manage to stay sane doing the same thing in the evenings. But the day we look forward to the most is Saturday. Saturday is our day. Actually, it’s my wife’s day, since I get to treat her with one of my most delicious recipes. She enjoys the food. I enjoy the cooking. And when we have company over, it makes for a delightful evening of giddiness and good time.

Born from my many Saturday food experiments comes my Eleven-Spice Chicken recipe. Yep, this is a true-blue, Jack Flacco original just like the sushi recipe I wrote about a few weeks ago. How this recipe came about was from watching nothing but the Food Network for a whole year and trying various BBQ recipes from multiple hosts. I tried a myriad of spices to get the right mix of what I liked. Some meals come out from the oven smelling incredible. Some—not so much. I would tweak the ingredients slightly and try again until I got the combination right. I did this until one day, my son said, “Boy, is this ever good!” That’s when I knew I had something. When I finally tasted it, he was right, “Boy, is this ever good!”

Now, if anyone ever asked, I used to hold on to my recipes like gold. Never quite revealing everything I’d put in them. Then I thought, that’s kind of selfish. The whole point of cooking is to share a great experience with people and have them try something unique. Something they never tried before. What better way to do that than to share it with you all!

Here we go, then…

Ingredients:

  • Black pepper
  • Brown sugar
  • Cayenne pepper
  • Coriander
  • Cumin
  • Curry powder
  • Garlic powder
  • Ginger powder
  • Onion powder
  • Paprika
  • Salt
  • Skinless chicken thighs and/or chicken legs

What prep looks like:

Chicken in a Glass Skillet
Chicken Prepared for the Oven

Directions:

  • Buy quality, skinless chicken. I tend to purchase my chicken thighs and legs from Costco. They have them packaged nicely and the thighs are already skinless, so you’ll save some time with prep. Also, you get a lot in the package, which will allow you to save money in the long run.
  • Get yourself a deep skillet and set your chicken in there. Some have argued chicken tastes better in a metal skillet as opposed to glass. I’ve tried both and I can’t really tell which tastes better. It’s going in the oven, not the BBQ. I’ll leave that up to you. Live on the wild side!
  • Spice the chicken. You’ll notice all the ingredients are powders. There’s a reason for this. With powders, you can control how much of a spice you’d like to taste in the meal. My rule of thumb is to put in what you like. Here is how I do it: Salt the meat. Nothing worse than tasting bland meat. Then sprinkle liberally all the other ingredients except for the brown sugar. Do it for both sides. Once you’re done, take a teaspoon of brown sugar and sprinkle it on one side as your last ingredient. When the dish comes out of the oven, you’ll find the sugar will have melted and caramelized over the chicken, helping to seal in the juices. I also use brown sugar because it contains molasses, which gives the dish an extra edge of rustic flavor over white, flavorless sugar.
  • Finally, preheat the oven to 375°F/190°C, cover the dish with tin foil and slip it into the oven for an hour. Once complete, take it out and enjoy!

If you like this recipe, pass it along.

Do you have any chicken recipes you’d like to share? If you’ve cooked this, how did it turn out?